Welcome to the Auto Dj help guide. There are several reasons why we suggest using our free Auto Dj software vs streaming live from your pc. The #1 rule when broadcasting is keep your listeners on your station as all times!!! When you are streaming from your pc to our servers you are open to modem drop outs, power outages, and many other factors. With Auto Dj your station broadcasts from our server. Our dedicated servers are sitting in huge server farms with the best back up systems out there. Our servers will keep your station running 24/7. Another suggestion would be going live when you would like to broadcast a show and then go back to Auto Dj when done. This guide will help you set up your Auto Dj account and get you up and running in no time.
AutoDJ
The AutoDJ tab includes options for configuring your stream's autoDJ, if enabled by your stream hosting provider. These settings are only required if you are permitted to upload media (MP3 files, etc.) to the server. If you will be providing your own, offsite source (such as a live broadcast, using something like WinAmp with the Oddcast plugin, or SAM Broadcaster) then the autoDJ may be disabled.
Options include:
AutoDJ status
Specifies whether the server-side streaming source should be enabled. Options include:
-
Disabled: If selected, server-side streaming support is turned off. This setting is necessary if you plan to provide your own streaming source.
-
Enabled: If selected, server-side streaming support will be turned on. This setting is necessary if you plan to upload your media library to the server and will not be providing your own streaming source.
Note that if the autoDJ is enabled, but no media (eg: MP3 files) have been uploaded, or media has not been added to an enabled playlist, the server will fail to start. As such, be sure to upload at least one track, and add one or more tracks to an enabled General Rotation playlist, before starting the server with autoDJ support enabled.
Royalty reporting capability
If enabled, the autoDJ will include a small tracking code at the end of the song titles shown in your listeners' media players. For example, instead of:
Artist Name – Song Title
You might see the following instead:
Artist Name – Song Title [C51B]
This allows detailed reports to be generated (on the Tracks tab of the View Statistics page) containing most of the information needed to make reports to the appropriate entities for royalty determination purposes.
If this option is disabled, the generated reports will be much less detailed and may not contain sufficient information for accurate royalty reporting purposes.
Rebuild playlist on startup
Specifies whether the playlist should be rebuilt automatically every time the server is started or restarted. If enabled, Centova Cast will re-index your media library and build a new playlist every time the server is started or restarted. If disabled, the same playlist will always be used unless you manually update it.
Note that if no playlist exists, Centova Cast will always build one regardless of this setting. Also note that when Centova Cast is operating with realtime track scheduling support (i.e., when using ices-cc), this setting is ignored or hidden.
Randomize playlist
Specifies whether the playlist should be randomized automatically by the streaming source. Enabling this setting is not recommended as it will interfere with Centova Cast's “Interval” playlist type. Instead, set your “General Rotation” playlists to play in random order.
Note that when Centova Cast is operating with realtime track scheduling support (i.e., when using ices-cc), this setting is ignored or hidden.
Genre
Specifies the genre of your stream.
Mount point
Note: this option may or may not be available depending on the server software being used by your hosting provider. More specifically, this option is for IceCast servers only.
Specifies the mount point to which the streaming source should connect. If unsure, simply set this to/streamas a default value.
Description
Note: this option may or may not be available depending on the server software being used by your hosting provider.
Specifies a description for your stream, which is used when submitting metadata to various directories.
Auto Dj Steps
1. The first thing you will want to do is review our ftp uploading guide. In order for auto dj to work you need at least 2 tracks loaded on your account. Auto dj will not activate until tracks are present.
2. Next you need to log into your radio account. We have several dedicated servers and you will need to know which server you are one. This can be located in your radio welcome email. Our radio log in links are http://www.reliastream.com/cast http://server2.reliastream.com http://server4.reliastream.com http://euro1.reliastream.com Once our main log in page loads you will need to enter your account name and password. At this point you should looking at your main radio account screen (as shown below). To see this screen enlarged simply click on the image.

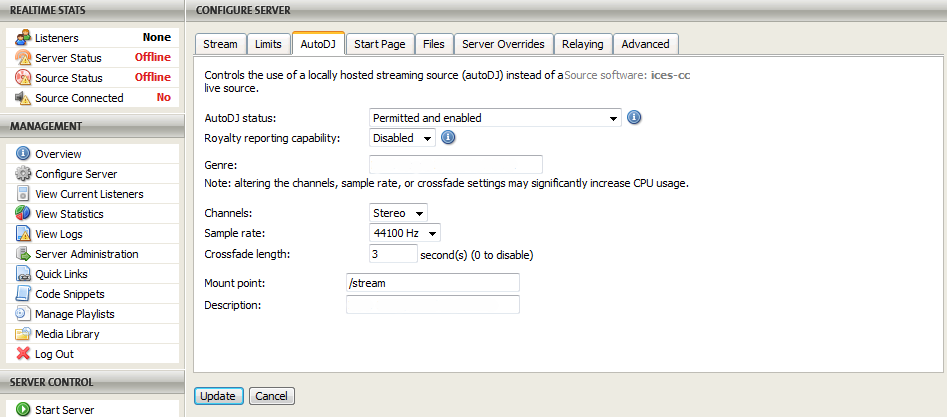
3. Now press the configure server tab located in the management section on the left side. This will take you to a new screen (as shown below). The first tab is the stream tab. You will want to fill that section out before you start your radio station. The information needed is pretty basic. If you need help filling out the stream info please review the Centova 2.2.4 manual (also located in our knowledgebase section). The tab you want to focus on is the auto dj tab. Click this tab and you will now see the auto dj settings. The auto dj status should be set to permitted and enabled. The second section involves royalty reporting. The next section is your genre section. You will want to fill this out and is based on the type of media you are playing. If you are broadcasting rock music you may want to enter Rock, Hard Rock, Heavy Metal in the genre section. You can put several words in the box. In most cases you can leave channels, sample rate, and mount point the way they are. You will not see crossfade length on your account. We control the crossfading and the default is set to 3 seconds. If you need this changed simply contact us and request a change. Typically you want to stay between 2 and 4 seconds. The last option is description and this is to tell your listeners what to expect, what you play. Most broadcasters simply copy and paste the genre into this box... up to you!! Once you are done press the update button at the bottom to save your new settings. Click the screen to enlarge.
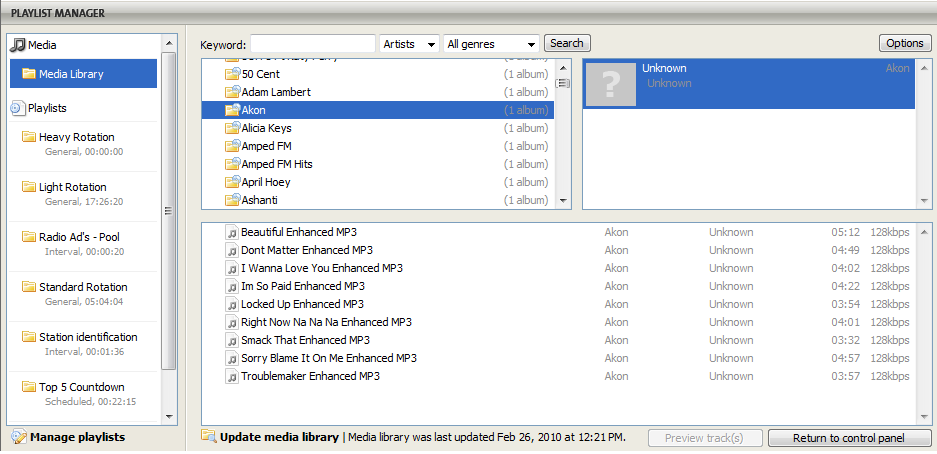
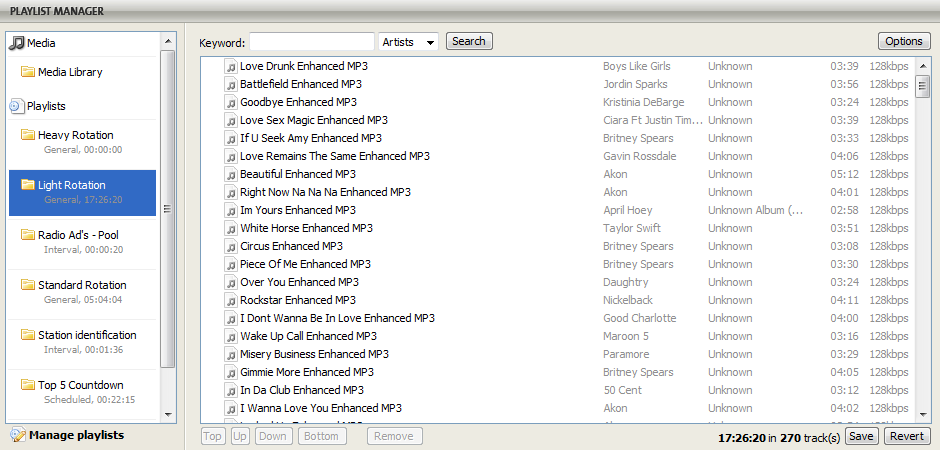
4. Assuming you have already uploaded your media to your account and updated your media library to show your media folders. In the management section press the media library tab. This is where you will start loading your folders for auto dj. The default folders will be shown in your account. You are able to control each folder, add new folders, schedual timed events, radio promo and jingles, ect via the manage playlists tab above the media library tab. See our manage playlist help guide for more information and help setting up your playlists. The image below shows an account with media already loaded. As shown we have selected Akon in the first box. the second box shows the different albums. In our case it is only one folder (you may see several listed here). Simply click on the the desired folder/ album. Once these steps are done the large box below will list all the media tracks in that folder. All you have to do at this point is drag and drop your tracks into your desired folders on the left side (media section). These folders are set up the same way fm/am radio stations set them up. They are based on play weight. Click image to enlarge.
Heavy Rotation Folder = The most air play
Standard Rotation = Medium amount of air play
Light Rotation = The least amount of air play
Station Identification = For radio jingles, spots, stabs, ect
5. Once you have moved all of your media to the desired folder(s) you will want to click on that folder and press the save button. The save button is located at the bottom right side of the screen. Be sure to save your updates!! See the image below. Click on the image to enlarge.
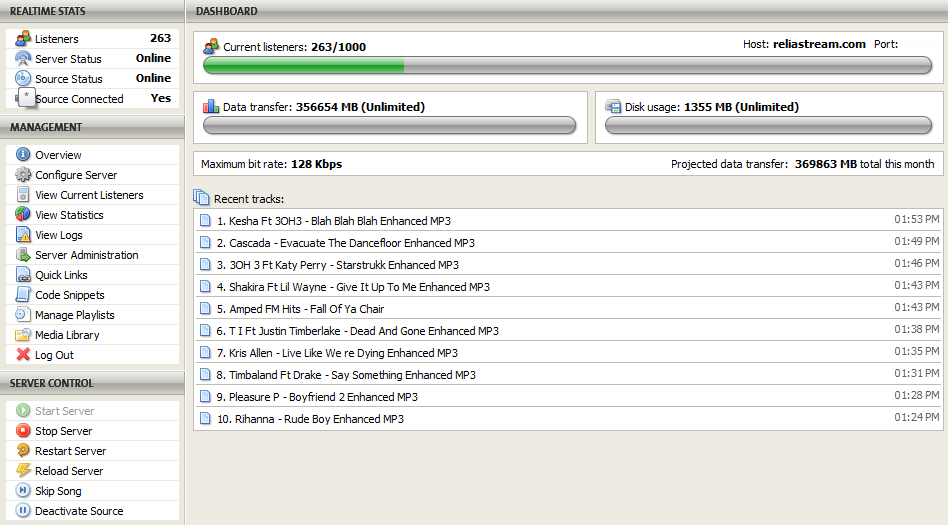
6. Once you have saved all your changes and updates it's time to start up your station. Click the back button to get to your main account page. The bottom left side is where you want to focus. You will notice a section called server control. The only tab you should be able to push in this section is start server. Go ahead and start the server. When your server starts the other tabs in the server control area will now be active. You will also notice the real time stats will be activated (top left). Your station is now broadcasting. If you want to listen to your station simply click on the one of the media player icons at the bottom of this screen (bottom right side). This will open up your selected player and your station should start playing. See image below. Click image to enlarge.
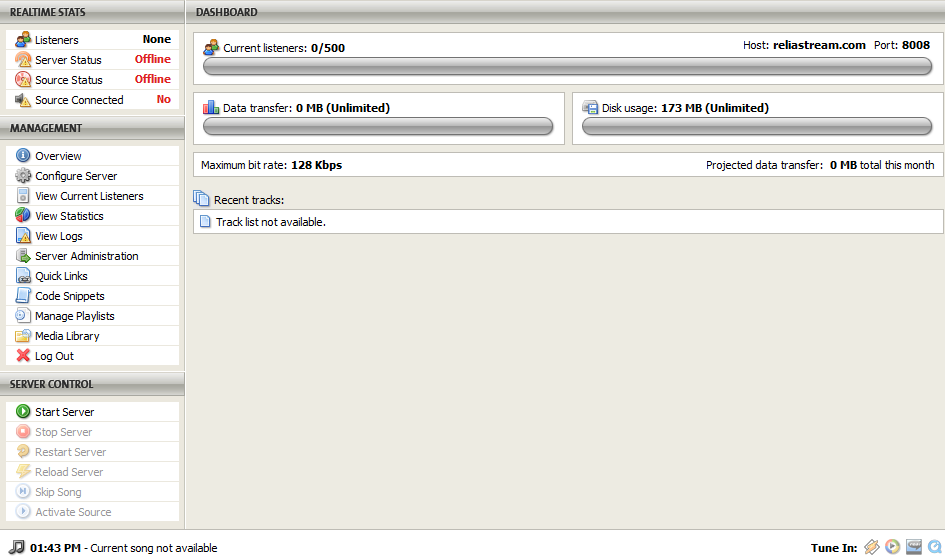
7. The end result will be your station is broadcasting to the world. You will see an active radio station in the image below. Take notice of the real time stats and the server control sections. You can add media tracks while your station is running. You can make changes, move tracks from one folder to another, and other options on the fly. Some changes may require you to restart your server (located in the server control section). In most cases pressing the update button will do the trick.
Do not load all of your tracks into one folder!! Auto dj can not function properly so be sure to load tracks into 2 folders or all 3. If you still have questions after following these steps please let us know. You will need to fill out a support ticket and we will be more then happy to help you. If you find any of this information not accurate please let us know. All of these steps and images was taken from our latest Centova software (ver 2.2.4).